# halcon视觉学习
halcon的功能模式有点像markdown编辑器,利用窗口操作来转化成你要编的程序,这样可以减低开发成本,halcon是 面向开发期短的工作岗位和机器视觉。
  邮箱:yiyangyu1314@outlook.com

  作者:易陽羽

  时间:2023-06-08
1
2
3
4
5
2
3
4
5
# 1.1 halcon软件界面
基本操作索引软件界面主要分为以下窗口:
1.图形窗口:图像可视化
2.算子窗口:算子手动修改,操作化
3.变量窗口:方便查询变量
4.程序窗口:编写代码
# 1.1.1 halcon常用快捷键
ctrl+E 打开浏览例程
ctrl+F 查找
F1 查看帮助
F2 重置程序
F3 取消注释
F4 注释
F5 运行程序
F6 单步运行程序

3.1 图像显示
算子	功能	单词
dev_open_window	新建图像窗口	开发
dis_display	图像显示
disp_message	显示字符串	信息
write_string	在设定的光标位置, write string
set_tposition	配合write_string,设置光标位置
4.1 图像转换
算子	功能	单词
rgb1_to_gray	rgb 转 gray
region_to_mean	平均灰度值
region_to_bin	转二进制图像(二值图像)
region_to_label	转标签图像(其他算子使用?)	标签
1
2
3
4
5
6
7
8
9
10
11
12
13
14
15
16
17
18
19
20
21
22
2
3
4
5
6
7
8
9
10
11
12
13
14
15
16
17
18
19
20
21
22
# 1.1.2 基本函数
*读取一张彩色图像
read_image (Image,'blister/blister_reference')
*得到图像通道数
count_channels(Image,Channels)
*彩色图像转灰度图
rgb1_to_gray(Image, GrayImage)
*彩色图像分离为三个通道图像
decompose3(Image,R,G,B)
*RGB转HSV和HSI
trans_from_rgb(R,G,B,H1,S1,V1,'hsv')
trans_from_rgb(R,G,B,H2,S2,I2,'hsi')
*HSV和HIS转RGB
trans_to_rgb(H1,S1,V1,ImageRed, ImageGreen,ImageBlue, 'hsv')
trans_to_rgb(H2,S2,I2,ImageRed1,ImageGreen1, ImageBlue1, 'hsi')

*将转换后的单通道RGB合并成RGB彩色图
compose3(ImageRed,ImageGreen,ImageBlue,ImageRGB)
*图像均值模糊
mean_image(GrayImage,ImageMean, 9, 9)
*图像相加,相减,相减的绝对值,线性拉伸,图像相乘除
add_image(GrayImage, ImageMean,ImageResult, 0.5, 0)
sub_image(GrayImage,ImageMean,ImageSub, 1,128)
abs_diff_image(GrayImage,ImageMean,ImageAbsDiff,1)
scale_image(ImageAbsDiff, ImageScaled, 5,20)
mult_image(GrayImage,ImageMean,ImageResult1,0.005, 0)
div_image(GrayImage,ImageMean,ImageResult2,255, 0)

*指数、gamma变换、图像反转、对数、幂、开方
exp_image(GrayImage,ExpImage, 'e')
gamma_image(GrayImage,GammaImage,0.416667,0.055, 0.0031308, 255, 'true')
invert_image(GrayImage,ImageInvert)
log_image(GrayImage,LogImage, 'e')
pow_image(GrayImage,PowImage, 2)
sqrt_image(GrayImage,SqrtImage)
pow_image(SqrtImage, PowImage1, 3)

*图像数据格式转换
convert_image_type(GrayImage,ImageConverted,'real')

*三角函数运算
sin_image(ImageConverted, SinImage)
cos_image(ImageConverted,CosImage)
tan_image(ImageConverted,TanImage)
asin_image(SinImage,ArcsinImage)
acos_image(CosImage,ArccosImage)
atan_image(TanImage,ArctanImage)
*取两幅图像的最大值或最小值
max_image(GrayImage,ImageMean,ImageMax)
min_image(GrayImage,ImageMean,ImageMin)
*创建一个单位变换矩阵,每次根据创建的平移或、旋转或缩放矩阵对图像进行平移、旋转、缩放操作
hom_mat2d_identity(HomMat2DIdentity)
*创建平移矩阵
hom_mat2d_translate(HomMat2DIdentity,20,50,HomMat2DTranslate)
*图像平移
affine_trans_image(GrayImage,ImageAffineTrans,HomMat2DTranslate, 'constant', 'false')
get_image_size(GrayImage,Width, Height)
*创建旋转矩阵
hom_mat2d_rotate(HomMat2DIdentity,rad(45),Width/2,Height/2, HomMat2DRotate)

*图像旋转
affize_trans_image(GrayImage,ImageAffineTrans1,HomMat2DRotate, 'constant', 'false')

*创建缩放矩阵
hom_mat2d_scale(HomMat2DIdentity, 2, 1.5,Width/2, Height/2, HomMat2DScale)

*图像缩放
affine_trans_image(GrayImage,ImageAffineTrans2,HomMat2DScale, 'constant', 'false')

*根据图像得到的region,通过计算中心和方向,利用vector_angle_to_rigid得到变换矩阵,然后进行图像放射变换
threshold(GrayImage,Region, 128, 255)
shape_trans(Region, RegionTrans, 'convex')
orientation_region(RegionTrans, Phi)
area_center(RegionTrans, Area, Row, Column)
vector_angle_to_rigid(Row, Column, Phi,Row, Column, 0, HomMat2D)
affine_trans_image(GrayImage,ImageAffineTrans3,HomMat2D, 'constant', 'false')
1
2
3
4
5
6
7
8
9
10
11
12
13
14
15
16
17
18
19
20
21
22
23
24
25
26
27
28
29
30
31
32
33
34
35
36
37
38
39
40
41
42
43
44
45
46
47
48
49
50
51
52
53
54
55
56
57
58
59
60
61
62
63
64
65
66
67
68
69
70
71
72
73
74
75
2
3
4
5
6
7
8
9
10
11
12
13
14
15
16
17
18
19
20
21
22
23
24
25
26
27
28
29
30
31
32
33
34
35
36
37
38
39
40
41
42
43
44
45
46
47
48
49
50
51
52
53
54
55
56
57
58
59
60
61
62
63
64
65
66
67
68
69
70
71
72
73
74
75
# 2.1 窗口显示
dev_update_window ('off')
dev_update_window ('on')程序执行打开和关闭期间,图像对象是否在图形窗口中显示
dev_clear_window ()
dev_close_window ()
dev_open_window (0, 0, Width, Height, 'black', WindowHandle)后面可以在这个句柄上显示

dev_set_draw ('margin')
dev_set_color ('white')
dev_set_colored (12)
dev_set_line_width (3)
dev_set_part( : : Row1, Column1, Row2, Column2 : )设置图形窗口中要显示的图像部分。 参数Row1和Column1指定左上角,Row2和Column2指定要显示的图像部分的右下角。
get_system ('operating_system', OS)

dev_display (Image)
set_display_font (WindowHandleZoom, 14, 'mono', 'true', 'false')
disp_continue_message (WindowID, 'black', 'true')
disp_ellipse (WindowID, Row, Column, Phi, Ra, Rb)
disp_cross (WindowHandle, RowCenterRegion, ColumnCenterRegion, 15, 0)
disp_arrow (WindowHandle, RowCenterRegion, ColumnCenterRegion, RowCenterRegion - 60 *sin(OrientationRegion), ColumnCenterRegion + 60 * cos(OrientationRegion), 2)
write_string(WindowHandle3, '请用鼠标画ROI')窗口写字
get_mbutton( : : WindowHandle : Row, Column, Button )原地等待直到鼠标按下
dump_window_image (DumpImage, WindowHandle)将窗口的内容截图成图像
1
2
3
4
5
6
7
8
9
10
11
12
13
14
15
16
17
18
19
20
21
22
23
2
3
4
5
6
7
8
9
10
11
12
13
14
15
16
17
18
19
20
21
22
23
# 2.2 窗口显示
## 图像、区域
read_image
write_image 第3个参数FillColor是输入变量,表示不属于图像区域的灰度像素填充值,默认值为0。
dump_window_image将窗口内其它信息(如箭头,指示文字等)也保存进Image,然后write_image保存;
parse_filename(ImageFiles, BaseName, Extension, Directory)获取文件名、后缀、文件夹
get_image_size
zoom_image_factor(Image : ImageZoomed : ScaleWidth, ScaleHeight, Interpolation : )根据缩放因子实现图像缩放
zoom_image_size(Image : ImageZoom : Width, Height, Interpolation : )根据尺寸进行图像的缩放
convert_image_type
channels_to_image把单通道图像转变为一个多通道图像。
rgb1_to_gray

scale_image(Image : ImageScaled : Mult, Add : )  图像灰度比例拉伸运算(黑的地方更黑,亮的地方更亮),    g’ := g * Mult + Add
emphasize (ImageInvert, ImageEmphasize, Width, Height, 1)增强图像的高频区域(边缘和拐角)的对比度, res := round((orig - mean) * Factor) + orig
illuminate(Image : ImageIlluminate : MaskWidth, MaskHeight, Factor : )增强图像的高频区域(边缘和拐角)的对比度


add_image
max_image
invert_image
mean_image
tile_images(Images : TiledImage : NumColumns, TileOrder : )NumColumns指最终拼成的图有多少列,TileOrder指子图片排列的顺序——垂直方向还是水平方向
tile_images_offset(Images : TiledImage : OffsetRow, OffsetCol, Row1, Col1, Row2, Col2, Width, Height : )
gen_image_const (ConstImage, 'byte', 11, 11)创建一个灰度值不变的图像
edges_image (Image, ImaAmp, ImaDir, 'mderiche2', 0.7, 'nms', 10, 20)使用Deriche、_Lanser、Shen或者_Canny滤波器提取只包含边缘的图像。
mirror_image (Image, ImageMirror, 'row')图像的镜像

add_channels 为区域添加灰度值
shape_trans (SelectedRegions, RegionTrans, 'rectangle2')*区域转化为矩形
compose3 (ImageRed, ImageGreen, ImageBlue, LogoImageTempl)将三幅图像合并成一幅图像
decompose3 (LogoImage, ImageR, ImageG, ImageB)将一幅图像根据RGB值转换成三幅图像。
access_channel(MultiChannelImage : Image : Channel : )访问多通道输入图像的某一个通道。 结果是一个单通道图像
intersection取出两个区域中重叠的部分
difference取出两个区域中不重叠的部分
complement(Region : RegionComplement : : )找到输入区域的补区域。
intensity(Regions,Images:::Mean,Deviation)计算Images中Regions的均值和方差。

get_domain (Image, Domain)图像转换成区域
reduce_domain获得特定区域Region位置的图像,不裁剪
move_region
zoom_region(Region : RegionZoom : ScaleWidth, ScaleHeight : )根据缩放因子对区域缩放
crop_domain对特定区域图像进行裁剪
crop_part从每个输入图像中剪切一个或多个矩形区域。 区域由矩形指示,这些矩形由其左上角的坐标及其大小定义。
connection将区域分散开,只要是没有交集的区域,都分成不同的单独小区域
select_shape
select_shape_std
select_shape_proto (Pads, BallBonds, MissingBonds, 'overlaps_rel', 0, 0)选出具有相似特征的所有区域
union1返回所有输入区域的并集
union2返回两个区域的并集
concat_obj通过concat只是把objects放到一起,没有实质上的合并,依然各过各的,union完之后,object就完全变成了一个了,不再好分开
skeleton骨架
count_obj
boundary边界
fill_up
fill_up_shape
area_center一个区域的面积(大小)和中心
smallest_circle最小外接圆的中心坐标和半径会被返回
inner_circle最大内接圆
gen_circle
diameter_region最小外接圆直径
smallest_rectangle2 (RegionTrans, Row, Column, Phi, Length1, Length2)
gen_rectangle2 (Rectangle, 300, 200, Phi, 100, 1)生成矩形

clip_region_rel (RegionBorder, RegionClipped, 5, 5, 5, 5)剪切的方法按照输入参数顶部剪切的行数,底部剪切的行数,左边剪切的列数,右边剪切的列数。
clip_region (HighZoomedMoved, HighAreas, 0, 0, 511, 511)剪切region里一个矩形出来,需要填入矩形的左上角点和右下角点,进行剪切
region_to_bin(Region : BinImage : ForegroundGray, BackgroundGray, Width, Height : )在Region中给定的输入区域转换为“字节”图像,并将ForegroundGray的灰度值分配给该区域中的所有像素。 如果输入区域大于生成的图像,则会在图像边框处裁剪。 背景灰度值设置为BackgroundGray。

## 区域延伸
expand_gray_ref (Regions, Image, EmptyRegion, RegionExpand, 'maximal', 'image', Mean, 11)根据灰度和颜色将分离的区域连通。
1
2
3
4
5
6
7
8
9
10
11
12
13
14
15
16
17
18
19
20
21
22
23
24
25
26
27
28
29
30
31
32
33
34
35
36
37
38
39
40
41
42
43
44
45
46
47
48
49
50
51
52
53
54
55
56
57
58
59
60
61
62
63
64
65
66
67
68
69
2
3
4
5
6
7
8
9
10
11
12
13
14
15
16
17
18
19
20
21
22
23
24
25
26
27
28
29
30
31
32
33
34
35
36
37
38
39
40
41
42
43
44
45
46
47
48
49
50
51
52
53
54
55
56
57
58
59
60
61
62
63
64
65
66
67
68
69
# 2.3 常用算子
* 图片信息获取
get_image_size * 获取图像尺寸
get_image_type * 图像类型 byte,int1,uint2 int2,int4 direction,real
get_image_time * 获取图像时间
get_image_pointer1 * 获取单通道的指针,尺寸类型
compose3 * 把3通道图像合成彩色图像
decompose3 * 把彩色图像解析成3通道图像
rgb_to_gray1|3 * 计算一种或三种通道的灰度值

* 颜色通道转换
tran_from_rgb * 把rgb 格式转化成为HSV|HSI
tran_to_rgb   * 把HSV|HSI 格式转化成为rgb
threshold     * 阈值分割/直方图选取 区域
threshold_sub_xld     * 亚像素阈值分割/直方图选取轮廓,是以线,点为单位
binary_threshold     * 自动获取阈值完成分割


connection    * 获取区域分组
select_shape  * 获取特征区域
select_contous_xld 轮廓选择
count_obj * 统计轮廓个数
gen_region_contoours_xml * 把轮廓填充为区域
fill_up       * 填充特征区域
reduce_domain * 从原图中扣去特征图相同的区域
mean_image * 计算均值滤波
dyn_threshold     * 局部阈值分割 与mean_image 一起使用,选取比均值大或小的区域

* 腐蚀膨胀
dilation_circle
dilation_rectangle1

gray_closing (Image, ImageReduced, ImageClosingFast)灰度值闭操作,结构元素在图像中遍历,灰度值最低的值作为新值,有使图像变暗的作用。
gray_opening (Image, ImageReduced, ImageOpeningFast) 灰度值开操作,结构元素在图像中遍历,灰度值最高的值作为新值,有使图像变亮的作用。

*  修改图像或区域的值
gen_image_const(Image,'byte',512,512)    //生成一个纯0图像,用byte格式
gen_image_proto (ImageReduced, ImageCleared, 255) 创建纯白图像
overpaint_gray ( ImageDestination, ImageSource : : : )  将灰度值不相同区域用不同颜色绘制到ImageDestination中,ImageSource包含希望的灰度值图像
overpaint_region ( Image, Region : : Grayval, Type : ) 将Region以一个恒定的灰度值绘制到Image图像中
paint_gray ( ImageSource, ImageDestination : MixedImage : : ) 将ImageSource的图像绘制到ImageDestination中,形成MixedImage。
paint_region ( Region, Image : ImageResult : Grayval, Type : ) 将Region以一个恒定的灰度值绘制到Image图像中
paint_xld ( XLD, Image : ImageResult : Grayval : ) 将XLD以一个恒定的灰度值绘制到Image图像中

get_region_points(RegionUnion, Rows, Columns)查询一个区域的像素坐标
get_grayval(DupImage2, Rows, Columns, Grayval)获得像素坐标对应像素值
set_grayval ( Image : : Row, Column, Grayval : ) 设置Image图像中坐标为(Row,Column)的灰度值

* 仿射变换
两种实现旋转的方法rotate_image和affine_trans_image
rotate_image是按逆时针方向进行旋转,而且旋转后的图片大小不变,但内容可能会有缺失。并且物体的中心在原图的位置和在旋转之后图片上的位置还会有差异。
为了解决使用rotate_image进行旋转产生的问题,可以所以建议使用旋转矩阵affine_trans_image来进行旋转。

text_line_slant (Image, Image, 140, -rad(45), rad(45), SlantAngle)自动检索文本行的斜率,第三个参数为字体拉升长度 >=原字符长度
hom_mat2d_slant (HomMat2DIdentity, -SlantAngle, 'x', 0, 0, HomMat2DSlant)向生成的二维变换的齐次变换矩阵中添加斜率
orientation_region用来计算区域的方向,将区域拟合为最小椭圆时,该椭圆长轴与水平方向的夹角
text_line_orientation (Needle, Needle, 35, -0.523599, 0.523599, OrientationAngle)确定文本行或段落的方向。
vector_angle_to_rigid (Row, Column, Phi, Row, Column, AimPhi, HomMat2D) 获得仿射变换矩阵
hom_mat2d_identity (HomMat2DIdentity)生成一个2D单位矩阵
hom_mat2d_translate (HomMat2DIdentity, -0.5*(Row1+Row2), -0.5*(Column1+Column2), HomMat2DTranslate)对矩阵进行变换,用于平移。
hom_mat2d_rotate (HomMat2DIdentity, -OrientationAngle, Px, Py, HomMat2DRotate)用于旋转
hom_mat2d_scale (HomMat2DTranslate, ScaleFactor, ScaleFactor, 0, 0, HomMat2DScale) 用于缩放
affine_trans_image对图像进行仿射变换
rotate_image (ImageScaleMax, ImageRotate, deg(-OrientationAngle), 'constant')将图像按照指定的角度旋转
1
2
3
4
5
6
7
8
9
10
11
12
13
14
15
16
17
18
19
20
21
22
23
24
25
26
27
28
29
30
31
32
33
34
35
36
37
38
39
40
41
42
43
44
45
46
47
48
49
50
51
52
53
54
55
56
57
58
59
60
61
62
63
2
3
4
5
6
7
8
9
10
11
12
13
14
15
16
17
18
19
20
21
22
23
24
25
26
27
28
29
30
31
32
33
34
35
36
37
38
39
40
41
42
43
44
45
46
47
48
49
50
51
52
53
54
55
56
57
58
59
60
61
62
63
# 2.4 数学几何算子
* 求角度
计算直线与水平轴之间的夹角 angle_lx( : : Row1, Column1, Row2, Column2 : Angle)
计算两条直线之间的夹角angle_ll( : : RowA1, ColumnA1, RowA2, ColumnA2, RowB1, ColumnB1, RowB2, ColumnB2 : Angle)
计算一条直线的方向line_orientation( : : RowBegin, ColBegin, RowEnd, ColEnd : Phi)
计算一条直线的参数line_position( : : RowBegin, ColBegin, RowEnd, ColEnd : RowCenter, ColCenter, Length, Phi)
计算区域等效椭圆的参数elliptic_axis(Regions : : : Ra, Rb, Phi)
计算区域的最小仿射外接矩形的参数smallest_rectangle2(Regions : : : Row, Column, Phi, Length1, Length2)
计算区域的方向orientation_region(Regions : : : Phi)

* 求距离
distance_pl:只算点到直线的距离。
distance_pp:计算两点之间的距离。
projection_pl:计算一个点到直线的垂足。
angle_ll:计算两条直线的夹角。
angle_lx:计算直线和x轴的夹角。

1.已知点与直线 求垂足
点(X,Y)
线(BeginX,BeginY,EndX,EndY)
projection_pl (X, Y, BeginX, BeginY, EndX, EndX, 垂足X, 垂足Y)

2.已知一线轮廓与所求平行线之间距离
已知线轮廓:contour
已知距离:Distance
gen_parallel_contour_xld(contour, parallelcontour, ‘regression_normal’, -Distance)
1
2
3
4
5
6
7
8
9
10
11
12
13
14
15
16
17
18
19
20
21
22
23
24
25
2
3
4
5
6
7
8
9
10
11
12
13
14
15
16
17
18
19
20
21
22
23
24
25
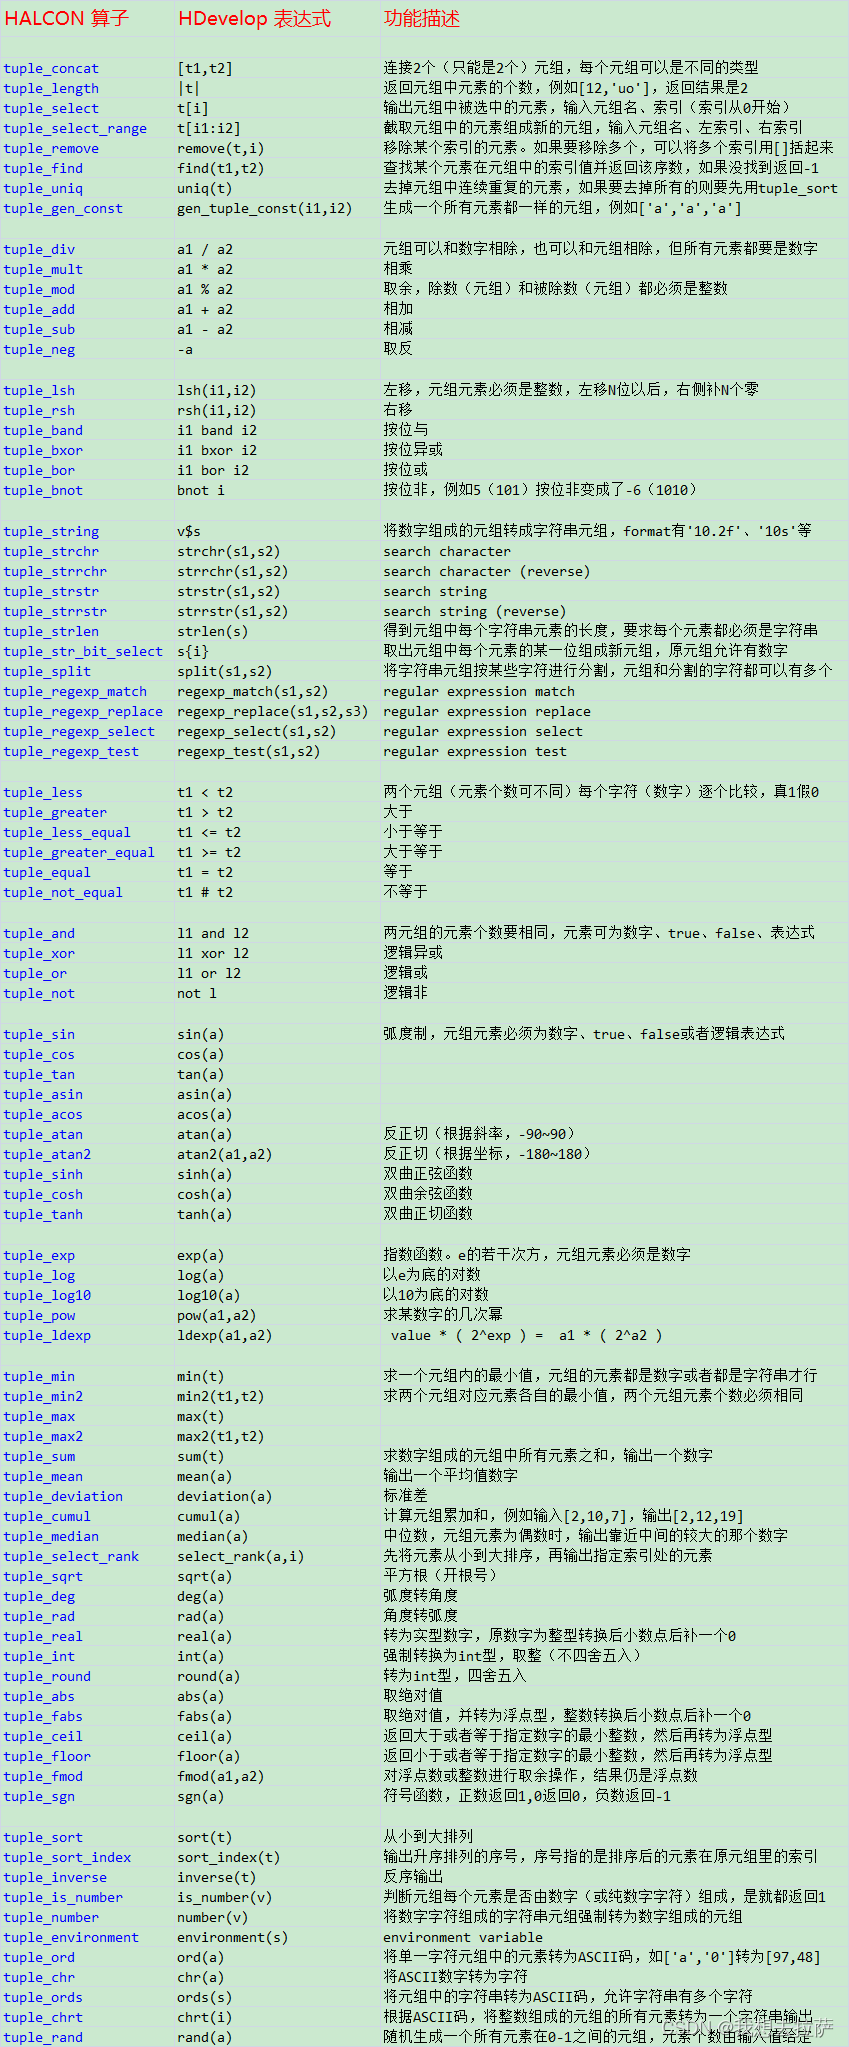
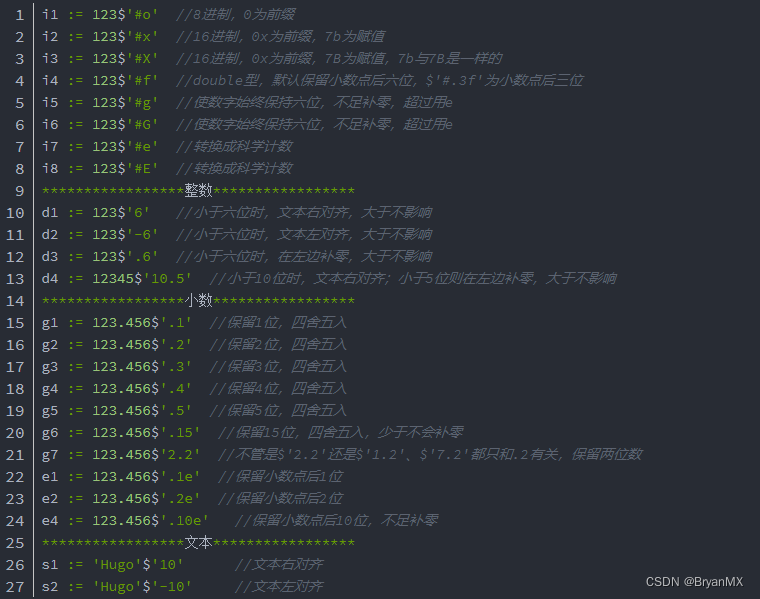
# 2.5 正则运算